Cheesy Hasselback Potatoes

Hassel6

In my last post, I told you about the original, basic recipe for Hasselback Potatoes. As I said then, this is a very versatile recipe.

Although the original recipe calls for lashings of warm, seasoned butter and does not use cheese, you can add just about any toppings or seasonings you wish. Loaded Hasselback Potatoes? Why not?!

Before I became very allergic to milk products, cheese was in my top 3 all-time favourite foods. One of the things I certainly miss is a hot cheesy jacket potato with bacon and sour cream! *SNIFF, SNIFF*

Cheesy Hasselback Potatoes are the Rolls Royce of cheesy potatoes! YUM!

INGREDIENTS

  • Potatoes, number as needed for serving (1 per person if large-sized, or 3 per person if small 2 inch-sized; clean well)
  • .5kg/1 pound/2 cups/453gms Butter
  • Salt
  • Ground Black Pepper
  • Garlic powder
  • .5kg/1 pound/453gms Cheddar Cheese
  • *1/4 cup, 40gms green onion (chopped) (Optional)

DIRECTIONS

  1. If you’re using the larger potatoes, preheat the oven to 210°C/Gas Mark 7/425°F; for small potatoes, preheat to 200°C/Gas Mark 6/400°F.
  2. Microwave potatoes on high for 8-10 minutes for large potatoes, and about 5 minutes for small ones.
  3. While the potatoes are in the microwave, slice the cheese into 3mm / 1/8″ pieces to fit between the potato sections; set aside.
  4. Remove the potatoes and set aside until cool enough to handle.
  5. 1 at a time, put the potatoes in the bowl of a wooden spoon or other large spoon, and cut across at about 3mm / 1/8″ intervals so that it looks like a fan.
    Hassel1C
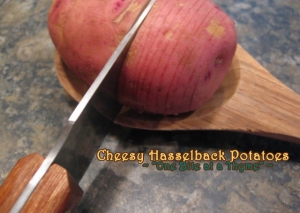
    (If you do not have a spoon large enough to hold the potato, lay butter knives on both sides of the potato to stop the knife cutting through.)
  6. Lightly coat the inside of a baking tin or dish with a tablespoon of butter.
  7. In a small pot, combine the remaining butter, 1 tsp each of salt, pepper, garlic powder, and if desired, ½ tsp chili powder (or more to taste). Melt over medium heat until it begins to bubble; remove. Do not boil the butter.
  8. Put the potatoes into the butter and coat well with a spoon, including between the slices.
  9. Place into the baking tin or dish.
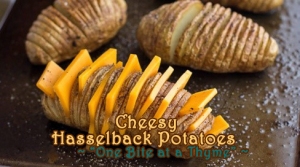
  10. Place the cheese slices between the potato sections.
    Hassel2
  11. Pour the butter over the potatoes to coat well.
  12. Sprinkle the top each potato well with salt and pepper and put in the oven.
  13. For larger potatoes, after 15 minutes, remove and CAREFULLY spoon the butter mixture in the pan over the potatoes and bake for another for about 10-15 minutes, and rest for 5 minutes out of the oven.
    For the small potatoes, cook for 10 minutes, baste with the butter, cook for another 10 minutes and rest for 5 minutes.
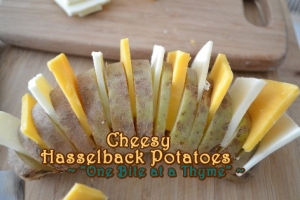
    Your potatoes will look like this:
    Hassel3
    My sister says foods are not truly “cheesy” unless there are four or more cheese involved  So, if you want the potatoes extra cheesy, you can use more than one kind of cheese:
    Hassel4
    Well, if you are like my sister, you might be saying the above potato is still not cheesy enough, heheh.
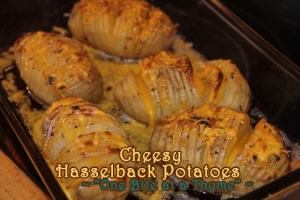
    So, you can also put butter or cheese in the slits & top with shredded cheese, and then add salt, pepper and garlic:
    Hassel5A
    The Result:
    Hassel5B
  14. Transfer the small potatoes to a plate to eat as appetisers, which can be served with sour cream or other dips  if desired. Transfer the large potatoes to individual plates, and serve.

OPTIONS: You can season these potatoes any way you desire, top them with a variety of meats.

  • How about ham and cheese? You can use cheddar, or swiss; or how about both? You can alternate between stuffing the slits with cheese and ham.
  • Another popular choice is chopped bacon and green onions. The onions can be served fresh, sprinkled over the top after the potatoes have cooked, or they can be sautéed with the bacon in the butter prior to coating the potatoes, and poured between the slices and over the potatoes in the baking tin/dish.
  • Another option is to cut bacon slices into 1” pieces, and alternate between bacon and cheddar in the slits.

Hassel3

Amazing Mayo Substitute

Cottage Cheese

These days food allergies are nearly epidemic proportions.

As a result, many people are having to find alternatives and substitutions for common foods. Here is an idea for one food substitution that you may find quite pleasing.

Are you allergic to eggs, but not dairy? Well, an egg allergy will certainly greatly limit what foods you can have, one of them being mayonnaise. Granted, there are vegan spreads out there that are designed to be mayo substitutes, but you may not want or cannot eat soya, among other ingredients.

Here is a simple solution for those who are not dairy allergic – cottage cheese.

Yes! You heard right! This classic food is a surprisingly wonderful option for chicken and tuna sandwich spread, or as a sandwich spread. It has that salty, tangy taste you find in mayo, but an additional plus is that the low-fat cottage cheese also has a fraction of the calories.

Pop the cottage cheese into a blender, or you can use a stick blender, to make a smooth spread. You can make a simple, tangy, slightly salty spread, or you can jazz it up with herbs and spices, lemon and/or lime juice, anything that pleases your pallet!

You can use this cottage cheese spread on sandwiches, burgers, to make chicken or tuna sandwich spread, it even makes a fantastic dip!

Falafel – A Middle Eastern Classic

Falafel

Falafel is a one of the better known foods of the middle east. It is a traditional Arab food, generally accepted a originating in Egypt. Traditionally, Arabs use fava beans to make Falafel.

However, most people outside of the middle east are familiar with the Israeli adaptation that uses chickpea instead of fava beans.

Israeli falafel is made from chickpeas. This is because many Jews have a hereditary enzymatic deficiency called glucose-6-phosphate dehydrogenase deficiency (G6PD) which can be triggered by fava beans.

The Yemenite Jewish immigrants to Israel created the falafel pita sandwiches, thus making falafel a more portable food.

Falafel is traditionally served in a pita bread (either folded or cut to open the pocket, and topped with lettuce, tomato, pickled vegetables, hot sauce, and drizzled with tahini-based sauces. Typically, in Israeli restaurants, these fried legume fritters are served with hummus and tahini.

I have included an Egyptian falafel recipe variation. The Egyptian version is greener and spicier. Additionally, chickpeas are gluten free, this recipe can further be made GF / Allergy Friendly by using a lettuce wrap in place of the pita.

Ingredients:

  • 1 cup dry chickpeas/garbanzo beans

  • 1 small onion, roughly chopped

  • 1/4 cup fresh parsley, chopped

  • 3-5 cloves roasted garlic (depending on how much you like garlic)

  • 1 1/2 tbsp flour (use suitable flour according to dietary restrictions)

  • 1 3/4 tsp salt

  • 2 tsp cumin

  • 1 tsp ground coriander

  • 1/4 tsp black pepper

  • 1/4 tsp cayenne

  • Pinch of ground cardamom

  • Light oil for frying (grapeseed, canola, and peanut oil are recommended)

Equipment needed:

  • Food processor

  • Skillet

Directions:

  1. Put the dry chickpeas into a large bowl or pot and cover them with cold water.

  2. Let them soak overnight. They will double in size as they soak.

  3. Drain and rinse the chickpeas well.

  4. Put the chickpeas into the food processor, with the onion, garlic, parsley, flour, salt, cumin, coriander, black pepper, cayenne, and cardamom.

  5. Pulse the ingredients together until a coarse meal forms. Scrape the sides of the processor occasionally to incorporate everything. The mixture should end up somewhere between the texture of couscous and a paste that holds together. Be careful to not over process or it will turn into hummus.

  6. Once the mixture is the desired consistency, turn it out into a bowl and stir it with a fork to further ensure the texture is even throughout. If the processor left any large pieces of chickpea, remove them.

  7. Cover the bowl and refrigerate for 1-2 hours.

  8. After the mixture has rested for 1-2 hours, put 1 1/2 inches of oil in a skillet and heat slowly over medium heat.

  9. Meanwhile, form the falafel mixture into either round balls or small patties with wet hands or a falafel scoop. Keep in mind, the balls will be delicate but once you get them into the hot oil, they should bind together and stick.

  10. To test of the oil is the right temperature, fry a small test ball of falafel batter in the center of the pan. If the oil is at the right temperature, it will golden brown in 2-3 minutes on each side. If it browns faster, lower the temperature a bit or your falafels will not be cooked inside. When the oil is at the right temperature, fry until golden brown in batches of 5-6 at a time.

  11. Remove the fried falafels to paper towels with a slotted spoon to drain.

Troubleshooting: If the balls don’t hold together, put the mixture back in the processor and process a bit more to make it more paste-like.  If they still won’t hold together, try adding 2-3 tbsp of flour to the mixture. If your falafel is too crunchy on the outside, either you have the oil too hot and need to turn it down; you didn’t process the mixture enough and must process the chickpea mixture more; or the chickpeas were old.

EGYPTIAN FALAFEL:

  1. Use 1 lb. dried, peeled fava beans instead of chickpeas; cover them with cold water, soak them for at least 24 hours, then drain and rinse.
  2. After the beans are soaked and rinsed, add the above Falafel ingredients to the processor along with the following ingredients –
    • 1 leek, cleaned, trimmed, and quartered
    • ¼ cup chopped dill
    • ¼ cup chopped cilantro
    • Additional ¾ tsp cayenne pepper.
  3. When mixture is processed to a coarse meal, pour into a bowl.
  4. Stir 2 ½ tbsp sesame seeds into the mixture with a fork until it’s evenly dispersed throughout the mixture.
  5. Refrigerate and proceed with frying. If mixture seems too “wet” when making the falafel balls, add additional flour by the teaspoonful until the mixture sticks together better.
  6. Continue with frying.

SESAME FALAFEL VARIATION:

  1. After forming the balls or patties, dip them in sesame seeds prior to frying. This will make the falafel coating crunchier and give it a slightly nutty flavor.

TURMERIC FALAFEL (YELLOW FALAFEL):

  1. Add ¾ tsp turmeric to the food processor prior to blending. The addition of turmeric boots the antioxidant levels.
HOW TO MAKE A FALAFEL PITA:
  1. Place the pita either in the microwave for 15-30 seconds so it will puff up or place it on a warm griddle.
  2. Once the pita is warmed and puffed at least slightly, cut the pita bread in half to form two “pockets.” Each pocket is a serving size.
  3. Spread each side with Hummus.
  4. Fill the pocket with the falafel balls or patties
  5. Add the fillings of your choice

Here are some traditional fillings to add to your pita; these are the ingredients that are most widely available at falafel stands throughout Israel:

  • Tahini sauce
  • Israeli salad: Chopped tomatoes, cucumbers, onions, and parsley combine, drizzled with lemon juice, olive oil, and garlic, topped with mint leaves.
  • Shredded lettuce
  • Sliced tomatoes
  • Onions
  • Tabouli
Here are some less traditional fillings that will also taste wonderful:
  • Cucumber
  • Sprouts
  • Roasted eggplant
  • Roasted sweet or hot peppers
  • Feta
  • Tzatziki

This quick and simple dish is also highly nutritious:

1 cup of Chickpeas:
Calories: 269
Fat: 4g
Chol: 0
Carb: 45g
Protein: 15g
Iron: 26% DVA

So the falafel, fresh vegetables, and a whole grain pita is a perfect, compact, healthy, inexpensive and tasty complete meal! This makes a great lunch box option for you and the kids! You can even use mini pita pockets for the kids!

Chinese 5 Spice Spicy Chicken

Chinese 5 Spice Powder Elements

It is a commonly held believed that Chinese 5 Spice gets its name because it is a blend of 5 spices. However, the  number 5 actually refers to the elements: wood, fire, earth, metal, and water. It is believed in traditional Chinese medicine that these elements are manifested in various areas of the human body, and that an imbalance in these elements are believed to be the cause of disease. As a result, for thousands of years a variety of herbs and spices have been used an in attempt to restore balance. This is the origin of 5 spice powder . Today, it is widely used to prepare a wide variety of Chinese and Asian dishes.

This recipe can use the traditional Chinese 5 Spice mixture, or a variation that has an additional spicy kick.

Traditional Chinese 5 Spice Powder
Combine in a bowl equal parts ground (powdered)

  • 3 tbs Cinnamon
  • 3 tbs Cloves
  • 3 tbs Fennel seed
  • 3 tbs Star anise
  • 3 tbs Peppercorns (Szechuan preferred)

Spicy 5 Spice Powder
Combine in a bowl equal parts ground (powdered)

  • 3 tbs  Cinnamon
  • 3 tbs  Clove
  • 3 tbs  Fennel seed
  • 3 tbs  Star Anise
  • 3 tbs Peppercorns (Szechuan preferred)
  • 3 tbs  Cayenne (red chilli) powder

If you do not have the above spices as powders, put whole spices into a pestle and mortar, or a spice grinder, and grind until a powder forms.

5 Spice Spicy Chicken

  • 4 chicken portions (legs, thighs and/or breasts)
  • 3 tbs  garlic and ginger paste
  • 3 tbs black pepper
  • 5 Spice Powder
  • 1/2 cup Extra Virgin Olive Oil

Directions

  1. In a large bowl or other receptacle, mix Five Spice powder, garlic/ginger paste, Olive Oil.
  2. When well combine, divide the mixture in 1/2 by pouring or spooning 1/2 into another smaller bowl
  3. Add chicken portions to the larger receptacle and coat completely with mixture.
  4. Set aside for 10 minutes. (The meat can be marinated for up to 24 hours if desired.)
  5. Place chicken in a roasting pan with deep sides.
  6. Bake/roast for 10 minutes at 350 degrees
  7. Remove from oven, carefully turn the portions over and use a spoon to baste the chicken with the reserved marinade.
  8. Return to the oven for 10 minutes.
  9. Remove from oven and with a fork and knife, cut into the meatiest portion to check for any pinkness inside the meat. If the meat is slightly pink, return to the oven for an additional 10 minutes, then check again. If the meat is white inside, it is cooked through.
  10. Once cooked through out, remove the roasting pan from the oven and set aside for 5 minutes.
  11. If there is any marinade remaining, you can stir it well and then heat it in the microwave for about 1-2 minutes (in a microwave safe container), this can then been used as a sauce to pour over the chicken and/or rice.

This can be eaten with either plain rice, or rice and peas mixed together. You can also create seasoned rice by pouring the remaining 5 Spice marinade over the rice. Other accompaniments could include steamed carrots, broccoli, green beans, snow peas – either individually or mixed together. Also, roasted potatoes would be nice with this dish.

Variation

You can also use this spice mixture and marinade with pork. This spice mixture would greatly complement any cut of pork.

Tequila Lime Shrimp with Chilli

Tequila Lime ShrimpThe grill is a fantastic way to cook so many types of foods, from vegetables, to meats and seafood. Shrimp takes on a glorious flavour when cooked over the open heat. While Tequila is not a staple of most American kitchens, there are many recipes – both Mexican, and American with a Mexican twist – that use Tequila as a special flavour note. Limes brighten any dish they are added to.

Add them all together and you have one dynamite meal that is sure to please any shrimp lover.

Total Time: 40 min
Prep:  20 min
Cook: 20 min
Yield: 6 servings

Ingredients

  • 2 pounds Large Shrimp, peeled and deveined
  • 6 tbsp Olive Oil  + 3 tbsp Olive Oil, divided
  • 3/4 tsp Chipotle Chilli Powder
  • 1 1/4 Garlic Powder
  • 1 tbsp Minced Garlic
  • 3/4 c Onion, finely chopped
  • 1/2 Poblano Chilli Pepper, stemmed, seeded, and minced
  • 1/4 cup Serrano Chilli, minced
  • 1/4 cup Lime Juice
  • 1/4 cup Tequila

Directions

1. Mix together the 6 tbsps of oil, chipotle chilli powder, garlic powder, lime juice, tequila  in a large plastic zipper lock bag.
2. Add the shrimp.
3. Carefully squeeze out as much air as possible and then seal the bag. Move the bag around to make sure the shrimp are well coated .
4. Marinate in the refrigerator for 20 minutes to 4 hours.
5. Preheat an outdoor grill for medium heat, and lightly oil the grate. Remove the shrimp from the marinade, and shake off excess. Set marinade aside.
6. Skewer the shrimp carefully. If possible, use flat skewers to prevent the shrimp moving an d spinning.
7. Cook the shrimp on the grill until bright pink on the outside and white inside; about 2 minutes per side.
8. Set aside and cover to keep warm.
9. In a large skillet over medium-high heat, heat the remaining 3 tbsp oil until hot but not smoking.
10. Add the onion, chilli peppers and minced garlic to the skillet and cook until soft, 3 to 4 minutes.
11. Add the lime juice and tequila marinade and stir, scraping any browned bits from the pan for about 1 minute.
12. Serve immediately either over the shrimp or on the side.

Variation:

Once you have marinated the shrimp, you can dip the wet shrimp into panko bread crumbs and deep fry for a variation in taste and texture. The deep fried shrimp would be great with lime rice, Spanish rice or even french fries.

Tip…

If it is too cold or even perhaps too hot to cook outside on the grill, this dish can be made completely in a skillet. Just cook the shrimp in a skillet instead of the grill, and then follow the rest of the instructions.

Tandoori Chicken (Tandoori Murgh)

Tandoori Chicken (Tandoori Murgh)

I have told you about the method of cooking known as Tandoor, and taught you how to make a spice blend for this called Tandoori Spice Mixture. Now, I will teach you how to make a dish using the Tandoor cooking method, with the Tandoori spices; Tandoori Chicken.

Chicken is a VERY versatile meat! It is a great ‘carrier’ for flavours. There are so many ways to cook it, you can have chicken every day of the week and never have it the same way twice.

Before we begin, a note about lemon and limes. Lemons are yellow and larger than their smaller, green counter parts – limes. Often, people outside the West get these two fruits confused, thinking a lime is a lemon that is not fully grown and rippened. While they are both citrus fruits, they truly are not the same fruit. They taste quite different but complement each other very nicely, which is why they are often used together.

Lemons are very sour to the mouth but have a fresh, bright  taste and feeling to the senses. Limes are sour and tart, giving it a fresh and slightly savoury sensation.

Be sure to use lemons, as the recipe calls for; do not exchange limes for lemons. This will change how the final product tastes.

For this recipe, you can use any portions of the chicken you prefer, however, it is worth noting that traditionally leg and thigh portions are used. I personally prefer to use breast meat as I am not fond of the leg portions. Leg meat is a darker meat in colour and has a heavier flavour because this is the most used portion of the chicken.

Preparation Time: 4 -24 hours (Marinading)
Cooking Time: 8 -15 minutes
Servings: 4 (1 breast per serving x 2 breasts, 2 thighs or 2 legs per serving = 4servings)

INGREDIENTS

2 – 2.5kg Chicken, portions or whole chicken to cut up your self
2 tsps Kashmiri red chilli powder
2 hot Green Chillies, roughly sliced
3 tbsps Lemon juice
1 tsp Salt425ml/1 pint Plain Yoghurt
2 tbsps Ginger paste
2 tbsps Garlic paste
-OR-
1 Garlic Clove, crushed
2.5cm/1in Piece Fresh Root Ginger, crushed
-OR-
4 tsps Garlic Ginger paste
1/2 tsp Garam Masala powder
1/2 tsp Chaat Masala
3 tbspn Yellow + 1 tbsp Red Food Colouring Drops, mixed together in a glass, no water
Butter to baste
1/2 Onion , cut into rings to serve
2 Lemons, cut into wedges to serve

DIRECTIONS

  1. Cut two deep slits crossways on the meaty parts of each leg and breast piece. The slits should be to bone.
  2. Apply a mixture of one teaspoon Kashmiri red chilli powder, one tablespoon lemon juice and salt over the chicken and set aside for half an hour.
  3. Meanwhile, combine the remaining Kashmiri red chilli powder, remaining lemon juice, salt, 2 tablespoons of the yoghurt, garlic, ginger, chillies and garam masala in a blender until smooth.
  4. Pour into a large bowl or zipper lock bag, add the remaining yoghurt to the mixture, and combine well.
  5. Put the chicken and all its accumulated juices into the large bowl or bag.
  6. Rub the marinade into the slits in the meat, then cover the bowl with cling film or zip the bag closed (make sure it is fully sealed) and refrigerate. You can marinade the chicken for 4 to 24 hours.
  7. If you are cooking this on a BBQ grill, you will need to preheat the grill according to manufacturer’s instructions. Otherwise, preheat the oven grill/broiler.
  8. Mix the red and yellow food colouring, it should become orange.
  9. Remove the chicken pieces from the marinade, shaking off the excess, and lay them in a single layer in another bowl. Pour the colouring over the chicken, turning to fully coat. Discard the leftover marinade.
  10. If you are cooking this in an oven, lay the chicken on a baking tray. Otherwise, lay the pieces on the grill rack. Either way, being sure the pieces are not touching.
  11. Cook for 8-10 minutes, and baste with butter. Breasts cook more quickly than the legs.
  12. Cook for additional 5-7 minutes, and then check to see if the chicken is cooked through; you can check whether they are done by piercing the chicken in the thickest part with a fork. The juices will run clear but the flesh should still feel springy to the touch.
  13. Place chicken on a serving plate and sprinkle chaat masala powder. Serve with onion rings and lemon wedges. The lemon wedges can be squeezed over the Tandoori Chicken if desired.

Did You Know….

While chicken is the traditional food that this marinade is used with, it can be used for a variety foods. You can also marinade and roast pork, paneer, or potatoes. Experiment with using the marinade for various meats and vegetables. You are sure to find many wonderful ways to use this Tandoori marinade to perk up your meals.

The Amazing Tandoor Oven

Tandoor Oven


All countries have their own variations for cuisine and cooking methods. Using fire, and charcoal have been a standard way to cook for millennia . The methods of containing the fire and charcoal vary. In many South Asian  and Middle Eastern countries, a tandoor is used.


What is a Tandoor?

A Tandoor is one of the original forms of cooking over charcoals. Traditionally, it is made of clay in the shape of a large pot. Modern Tandoor’s are an upright cylindrical shape. Tandoor also has a lid, which is used to partially cover the oven during cooking if a temperature increase is needed. When the Tandoor no longer needs to be lit, it is fully covered to suffocate the fire. This is also a safety feature.

How Does a Tandoor Work?

Once lit, the heat from the fire and burning wood or charcoal is absorbed by the walls of the Tandoor. The hotter the fire, faster the wood burns, and as a result, the faster the walls heat. Eventually, the heat rises to 650º F and the surface becomes ‘white hot’. The temperatures can reach an amazing 900º F. It is  common for a Tandoor to be lit for anywhere from several hours  to days and is used to cook meats and certain breads. Once the surface becomes white hot, the burning of the wood is stopped, and the coals are used. The heat absorbed by the walls radiates and the combination of radiant heat from the walls and direct heat from the coals creates a combination of baking, roasting and grilling the meat simultaneously. There are modern tandoors that use electricity or gas rather than of wood or charcoal.

What are Some of the Most Famous Indian Foods Cooked in a Tandoor?

If food is cooked in a Tandoor, it is known as Tandoori, such as Tandoori Chicken. This is the most popular and famous of the foods that are cooked in a Tandoor. This Indian dish is eaten world wide. Meant is the most common item to be cooked in a Tandoor. The meat, such as chicken, beef, lamb, and fish , is spiced, prepared according to the recipe being used, and then skewered and suspended over the hot coals. Chicken Tikka, Bajari Kabab, and Reshmi Kabab are also populare Tandoori dishes. Breads are also prepared in the Tandoor. Naan is  traditionally cooked on the internal walls of a Tandoor.

Is India the Only Country that Uses the Tandoor?

The Tandoor has been used for centuries for cooking in  Iran, Turkey, Afghanistan,  the Balkans, the Transcaucasus, Central Asia , the Middle East, Bangladesh, India and Pakistan. The tandoor use in India was popularised during Mogul (Muslim) reign in South Asia. The word tandoor is  a Hindi word used in India, the same oven is also known by other names in other cultures. For example, in Armenia it is called a tonir and in the Republic of Georgia, it is called a tone.

Through out the world, there are so many different methods of preparing food, and cooking it. Experiencing other cultures, and their cuisine can be a wonderful, fulfilling experience. Indian cuisine is among these cuisines that offers a wonderful spectrum of taste, textures, colours and sensory pleasures. Tandoor cooking is just one of these wonderful methods to produce the taste sensations.

Did You Know….

You can make Tandoori chicken at home in your oven, using the oven and grill/broiler. While the results wont be exactly like one gets from a Tandoor, it will still produce a tasty product if correct methods and a good recipe are followed.

I will be posting a recipe for a Tandoor spice mixture, as well as a recipe and method for making Tandoori Chicken at home.